
Reading and Writing Image Files with the OpenEXR Library
Document Purpose and Audience
This document shows how to write C++ code that reads and writes OpenEXR 2.0 image files.
The text assumes that the reader is familiar with OpenEXR terms like “channel”, “attribute”, “data window” or “deep data”. For an explanation of those terms see the Technical Introduction to OpenEXR document.
The OpenEXR source distribution contains a subdirectory, OpenEXRExamples, with most of the code examples below. A Makefile is also provided, so that the examples can easily be compiled and run.
A description of the file structure and format is provided in OpenEXR File Layout.
Scan Line Based and Tiled OpenEXR files
In an OpenEXR file, pixel data can be stored either as scan lines or as tiles. Files that store pixels as tiles can also store multi-resolution images. For each of the two storage formats (scan line or tile-based), the OpenEXR library supports two reading and writing interfaces:
The first, fully general, interface allows access to arbitrary channels, and supports many different in-memory pixel data layouts.
The second interface is easier to use, but limits access to 16-bit (HALF) RGBA (red, green, blue, alpha) channels, and provides fewer options for laying out pixels in memory.
The interfaces for reading and writing OpenEXR files are implemented in the following eight C++ classes:
tiles |
scan lines |
scan lines and tiles |
|
|---|---|---|---|
arbitrary channels |
|
|
|
|
|
||
RGBA only |
|
|
|
|
|
The classes for reading scan line based images (InputFile and
RgbaInputFile) can also be used to read tiled image files. This way,
programs that do not need support for tiled or multi-resolution images
can always use the rather straightforward scan line interfaces, without
worrying about complications related to tiling and multiple resolutions.
When a multi-resolution file is read via a scan line interface, only the
highest-resolution version of the image is accessible.
Multi-Part and Deep Data
The procedure for writing multi-part and deep data files is similar to writing scan line and tile. Though there is no simplified interface, such as the RGBA-only interface.
This table describes the significant differences between writing single-part scan line and tile files and writing multi-part and deep data files.
Feature |
scan line and tile |
Multi-part and deep data |
|---|---|---|
Channel names may be reserved |
Some channel names are reserved in practice, but were never formally defined. |
Channel name “sample count” is reserved for a pixel sample count slice in frame buffer. Note: The name “sample count” (all lowercase) is subject to change. |
Multiple parts |
Single-part format is intended for storing a single multichannel image |
Multi-part files support multiple independent parts. This allows storing multiple views in the same file for stereo images, storing multiple resolutions in different parts. It is possible to include one or more scan line, tile, deep scan line or deep tile format images within a multi-part file. Custom data formats can also be used to store additional parts, but this is outside the scope of this document. |
Backwards-compatible low-level io available |
The new formats share the same abstract low-level IO as OpenEXR 1.7. It is therefore possible to use the same libraries to implement low level IO to read both formats. |
|
Using the RGBA-only Interface for Scan Line Based Files
Writing an RGBA Image File
Writing a simple RGBA image file is fairly straightforward:
1void
2writeRgba1 (const char fileName[], const Rgba* pixels, int width, int height)
3{
4    RgbaOutputFile file (fileName, width, height, WRITE_RGBA); // 1
5    file.setFrameBuffer (pixels, 1, width);                    // 2
6    file.writePixels (height);                                 // 3
7}
Construction of an RgbaOutputFile object, on line 4, creates an OpenEXR header,
sets the header’s attributes, opens the file with the specified name, and stores
the header in the file. The header’s display window and data window are both set
to (0,0) - (width-1, height-1). The channel list contains four channels,
R, G, B, and A, of type half.
Line 5 specifies how the pixel data are laid out in memory. In our
example, the pixels pointer is assumed to point to the beginning of an
array of width*height pixels. The pixels are represented as Rgba
structs, which are defined like this:
1struct Rgba
2{
3    half r; // red
4    half g; // green
5    half b; // blue
6    half a; // alpha (opacity)
7};
The elements of our array are arranged so that the pixels of each scan
line are contiguous in memory. The setFrameBuffer() function takes
three arguments, base, xStride, and ystride. To find the address
of pixel (x,y), the RgbaOutputFile object computes
base + x * xStride + y * yStride.
In this case, base, xStride and yStride are set to
pixels, 1, and width, respectively, indicating that pixel
(x,y) can be found at memory address
pixels + 1 * x + width * y.
The call to writePixels(), on line 6, copies the image’s pixels from
memory to the file. The argument to writePixels(), height, specifies
how many scan lines worth of data are copied.
Finally, returning from function writeRgba1() destroys the local
RgbaOutputFile object, thereby closing the file.
Why do we have to tell the writePixels() function how many scan lines
we want to write? Shouldn’t the RgbaOutputFile object be able to
derive the number of scan lines from the data window? The OpenEXR library
doesn’t require writing all scan lines with a single writePixels()
call. Many programs want to write scan lines individually, or in small
blocks. For example, rendering computer-generated images can take a
significant amount of time, and many rendering programs want to store
each scan line in the image file as soon as all of the pixels for that
scan line are available. This way, users can look at a partial image
before rendering is finished. The OpenEXR library allows writing the scan
lines in top-to-bottom or bottom-to-top direction. The direction is
defined by the file header’s line order attribute (INCREASING_Y or
DECREASING_Y). By default, scan lines are written top to bottom
(INCREASING_Y).
You may have noticed that in the example above, there are no explicit
checks to verify that writing the file actually succeeded. If the OpenEXR
library detects an error, it throws a C++ exception instead of returning
a C-style error code. With exceptions, error handling tends to be easier
to get right than with error return values. For instance, a program that
calls our writeRgba1() function can handle all possible error
conditions with a single try/catch block:
1try
2{
3    writeRgba1 (fileName, pixels, width, height);
4}
5catch (const std::exception &exc)
6{
7    std::cerr << exc.what() << std::endl;
8}
Writing a Cropped RGBA Image
Now we are going to store a cropped image in a file. For this example,
we assume that we have a frame buffer that is large enough to hold an
image with width by height pixels, but only part of the frame buffer
contains valid data. In the file’s header, the size of the whole image
is indicated by the display window, (0,0) - (width-1, height-1), and
the data window specifies the region for which valid pixel data exist.
Only the pixels in the data window are stored in the file.
 1void
 2writeRgba2 (
 3    const char   fileName[],
 4    const Rgba*  pixels,
 5    int          width,
 6    int          height,
 7    const Box2i& dataWindow)
 8{
 9    Box2i          displayWindow (V2i (0, 0), V2i (width - 1, height - 1));
10    RgbaOutputFile file (fileName, displayWindow, dataWindow, WRITE_RGBA);
11    file.setFrameBuffer (pixels, 1, width);
12    file.writePixels (dataWindow.max.y - dataWindow.min.y + 1);
13}
The code above is similar to that in Writing an RGBA Image File, where the
whole image was stored in the file. Two things are different, however: When the
RgbaOutputFile object is created, the data window and the display window are
explicitly specified rather than being derived from the image’s width and
height. The number of scan lines stored in the file by writePixels() is
equal to the height of the data window instead of the height of the whole
image. Since we are using the default INCREASING_Y direction for storing the
scan lines in the file, writePixels() starts at the top of the data window,
at y coordinate dataWindow.min.y, and proceeds toward the bottom, at y
coordinate dataWindow.max.y.
Even though we are storing only part of the image in the file, the frame
buffer is still large enough to hold the whole image. In order to save
memory, a smaller frame buffer could have been allocated, just big
enough to hold the contents of the data window. Assuming that the pixels
were still stored in contiguous scan lines, with the pixels pointer
pointing to the pixel at the upper left corner of the data window, at
coordinates (dataWindow.min.x, dataWindow.min.y), the arguments to the
setFrameBuffer() call would have to be to be changed as follows:
1int dwWidth = dataWindow.max.x - dataWindow.min.x + 1;
2file.setFrameBuffer (pixels - dataWindow.min.x - dataWindow.min.y * dwWidth, 1, dwWidth);
With these settings, evaluation of
base + x * xStride + y * yStride
for pixel (dataWindow.min.x, dataWindow.min.y) produces
 1 pixels - dataWindow.min.x - dataWindow.min.y * dwWidth
 2    + dataWindow.min.x * 1
 3    + dataWindow.min.y * dwWidth
 4
 5 = pixels -
 6     - dataWindow.min.x
 7     - dataWindow.min.y * (dataWindow.max.x - dataWindow.min.x + 1)
 8     + dataWindow.min.x
 9     + dataWindow.min.y * (dataWindow.max.x - dataWindow.min.x + 1)
10 = pixels,
which is exactly what we want. Similarly, calculating the addresses for pixels
(dataWindow.min.x+1, dataWindow.min.y) and (dataWindow.min.x,
dataWindow.min.y+1) yields pixels+1* and *pixels+dwWidth, respectively.
Storing Custom Attributes
We will now to store an image in a file, and we will add two extra
attributes to the image file header: a string, called comments, and a
4×4 matrix, called cameraTransform.
 1void
 2writeRgba3 (
 3    const char  fileName[],
 4    const Rgba* pixels,
 5    int         width,
 6    int         height,
 7    const char  comments[],
 8    const M44f& cameraTransform)
 9{
10    Header header (width, height);
11
12    header.insert ("comments", StringAttribute (comments));
13    header.insert ("cameraTransform", M44fAttribute (cameraTransform));
14
15    RgbaOutputFile file (fileName, header, WRITE_RGBA);
16    file.setFrameBuffer (pixels, 1, width);
17    file.writePixels (height);
18}
The setFrameBuffer() and writePixels() calls are the same as in the
previous examples, but construction of the RgbaOutputFile object is
different. The constructors in the previous examples automatically
created a header on the fly, and immediately stored it in the file. Here
we explicitly create a header and add our own attributes to it. When we
create the RgbaOutputFile object, we tell the constructor to use our
header instead of creating its own.
In order to make it easier to exchange data between programs written by
different people, the OpenEXR library defines a set of standard attributes for
commonly used data, such as colorimetric information, time and place where an
image was recorded, or the owner of an image file’s content. For the current
list of standard attributes, see the header file ImfStandardAttributes.h. The
list is expected to grow over time as OpenEXR users identify new types of data
they would like to represent in a standard format. If you need to store some
piece of information in an OpenEXR file header, it is probably a good idea to
check if a suitable standard attribute exists, before you define a new
attribute.
Reading an RGBA Image File
Reading an RGBA image is almost as easy as writing one:
 1void
 2readRgba1 (
 3    const char fileName[], Array2D<Rgba>& pixels, int& width, int& height)
 4{
 5    RgbaInputFile file (fileName);
 6    Box2i         dw = file.dataWindow ();
 7
 8    width  = dw.max.x - dw.min.x + 1;
 9    height = dw.max.y - dw.min.y + 1;
10    pixels.resizeErase (height, width);
11
12    file.setFrameBuffer (&pixels[0][0] - dw.min.x - dw.min.y * width, 1, width);
13    file.readPixels (dw.min.y, dw.max.y);
14}
Constructing an RgbaInputFile object, passing the name of the file to
the constructor, opens the file and reads the file’s header.
After asking the RgbaInputFile object for the file’s data window, we
allocate a buffer for the pixels. For convenience, we use the OpenEXR
library’s Array2D class template (the call to resizeErase() does the
actual allocation). The number of scan lines in the buffer is equal to
the height of the data window, and the number of pixels per scan line is
equal to the width of the data window. The pixels are represented as
Rgba structs.
Note that we ignore the display window in this example; in a program that wanted to place the pixels in the data window correctly in an overall image, the display window would have to be taken into account.
Just as for writing a file, calling setFrameBuffer() tells the
RgbaInputFile object how to access individual pixels in the buffer.
(See also Writing a Cropped RGBA Image.)
Calling readPixels() copies the pixel data from the file into the
buffer. If one or more of the R, G, B, and A channels
are missing in the file, the corresponding field in the pixels is
filled with an appropriate default value. The default value for R,
G and B is 0.0, or black; the default value for A is 1.0,
or opaque.
Finally, returning from function readRgba1() destroys the local
RgbaInputFile object, thereby closing the file.
Unlike the RgbaOutputFile's writePixels() method,
readPixels() has two arguments. Calling readPixels(y1,y2)
copies the pixels for all scan lines with y coordinates from y1 to
y2 into the frame buffer. This allows access to the the scan
lines in any order. The image can be read all at once, one scan line
at a time, or in small blocks of a few scan lines. It is also possible
to skip parts of the image.
Note that even though random access is possible, reading the scan lines
in the same order as they were written, is more efficient. Random access
to the file requires seek operations, which tend to be slow. Calling the
RgbaInputFile’s lineOrder() method returns the order in which the scan
lines in the file were written (INCREASING_Y or DECREASING_Y). If
successive calls to readPixels() access the scan lines in the right
order, the OpenEXR library reads the file as fast as possible, without
seek operations.
Reading an RGBA Image File in Chunks
The following shows how to read an RGBA image in blocks of a few scan lines. This is useful for programs that want to process high-resolution images without allocating enough memory to hold the complete image. These programs typically read a few scan lines worth of pixels into a memory buffer, process the pixels, and store them in another file. The buffer is then re-used for the next set of scan lines. Image operations like color-correction or compositing (“A over B”) are very easy to do incrementally this way. With clever buffering of a few extra scan lines, incremental versions of operations that require access to neighboring pixels, like blurring or sharpening, are also possible.
 1void
 2readRgba2 (const char fileName[])
 3{
 4    RgbaInputFile file (fileName);
 5    Box2i         dw = file.dataWindow ();
 6
 7    int           width  = dw.max.x - dw.min.x + 1;
 8    Array2D<Rgba> pixels (10, width);
 9
10    while (dw.min.y <= dw.max.y)
11    {
12        file.setFrameBuffer (
13            &pixels[0][0] - dw.min.x - dw.min.y * width, 1, width);
14
15        file.readPixels (dw.min.y, min (dw.min.y + 9, dw.max.y));
16
17        // processPixels (pixels)
18
19        dw.min.y += 10;
20    }
21}
Again, we open the file and read the file header by constructing an
RgbaInputFile object. Then we allocate a memory buffer that is
just large enough to hold ten complete scan lines. We call
readPixels() to copy the pixels from the file into our buffer, ten
scan lines at a time. Since we want to re-use the buffer for every
block of ten scan lines, we have to call setFramebuffer() before
each readPixels() call, in order to associate memory address
&pixels[0][0] first with pixel coordinates (dw.min.x,
dw.min.y), then with (dw.min.x, dw.min.y+10), (dw.min.x,
dw.min.y+20) and so on.
Reading Custom Attributes
In Storing Custom Attributes, we showed how to store custom attributes in the image file header. Here we show how to test whether a given file’s header contains particular attributes, and how to read those attributes’ values.
1void
2readHeader (const char fileName[])
3{
4 RgbaInputFile file (fileName);
5
6 const StringAttribute* comments =
7 file.header ().findTypedAttribute<StringAttribute> ("comments");
8
9 const M44fAttribute* cameraTransform =
10 file.header ().findTypedAttribute<M44fAttribute> ("cameraTransform");
11
12 if (comments) cout << "commentsn " << comments->value () << endl;
13
14 if (cameraTransform)
15 cout << "cameraTransformn" << cameraTransform->value () << flush;
16}
As usual, we open the file by constructing an RgbaInputFile object.
Calling findTypedAttribute<T>(n) searches the header for an
attribute with type T and name n. If a matching attribute is
found, findTypedAttribute() returns a pointer to the attribute. If
the header contains no attribute with name n, or if the header
contains an attribute with name n, but the attribute’s type is not
T, findAttribute() returns 0. Once we have pointers to the
attributes we were looking for, we can access their values by calling
the attributes’ value() methods.
In this example, we handle the possibility that the attributes we want
may not exist by explicitly checking for 0 pointers. Sometimes it
is more convenient to rely on exceptions instead. Function
typedAttribute(), a variation of findTypedAttribute(), also
searches the header for an attribute with a given name and type, but
if the attribute in question does not exist, typedAttribute()
throws an exception rather than returning 0.
Note that the pointers returned by findTypedAttribute() point to
data that are part of the RgbaInputFile object. The pointers
become invalid as soon as the RgbaInputFile object is
destroyed. Therefore, the following will not work:
1void
2readComments (const char fileName[], const StringAttribute *&comments)
3{
4 // error: comments pointer is invalid after this function returns
5
6 RgbaInputFile file (fileName);
7
8 comments = file.header().findTypedAttribute <StringAttribute> ("comments");
9}
readComments() must copy the attribute’s value before it returns; for
example, like this:
1void
2readComments (const char fileName[], string &comments)
3{
4 RgbaInputFile file (fileName);
5
6 comments = file.header().typedAttribute<StringAttribute>("comments").value();
7}
Luminance/Chroma and Gray-Scale Images
Writing an RGBA image file usually preserves the pixels without losing any data; saving an image file and reading it back does not alter the pixels’ R, G, B and A values. Most of the time, lossless data storage is exactly what we want, but sometimes file space or transmission bandwidth are limited, and we would like to reduce the size of our image files. It is often acceptable if the numbers in the pixels change slightly as long as the image still looks just like the original.
The RGBA interface in the OpenEXR library supports storing RGB data in luminance/chroma format. The R, G, and B channels are converted into a luminance channel, Y, and two chroma channels, RY and BY. The Y channel represents a pixel’s brightness, and the two chroma channels represent its color. The human visual system’s spatial resolution for color is much lower than the spatial resolution for brightness. This allows us to reduce the horizontal and vertical resolution of the RY and BY channels by a factor of two. The visual appearance of the image doesn’t change, but the image occupies only half as much space, even before data compression is applied. (For every four pixels, we store four Y values, one RY value, and one BY value, instead of four R, four G, and four B values.)
When opening a file for writing, a program can select how it wants the
pixels to be stored. The constructors for class RgbaOutputFile
have an rgbaChannels argument, which determines the set of
channels in the file:
|
red, green, blue, alpha |
|
luminance, chroma |
|
luminance, chroma, alpha |
|
luminance only |
|
luminance, alpha |
WRITE_Y and WRITE_YA provide an efficient way to store
gray-scale images. The chroma channels for a gray-scale image contain
only zeroes, so they can be omitted from the file.
When an image file is opened for reading, class RgbaInputFile
automatically detects luminance/chroma images and converts the pixels
back to RGB format.
Using the General Interface for Scan Line Based Files
Writing an Image File
This example demonstrates how to write an OpenEXR image file with two
channels: one channel, of type HALF, is called G, and the other,
of type FLOAT, is called Z. The size of the image is width by
height pixels. The data for the two channels are supplied in two
separate buffers, gPixels and zPixels. Within each buffer, the
pixels of each scan line are contiguous in memory.
1void
2writeGZ1 (
3 const char fileName[],
4 const half* gPixels,
5 const float* zPixels,
6 int width,
7 int height)
8{
9 Header header (width, height); // 1
10 header.channels ().insert ("G", Channel (HALF)); // 2
11 header.channels ().insert ("Z", Channel (FLOAT)); // 3
12
13 OutputFile file (fileName, header); // 4
14
15 FrameBuffer frameBuffer; // 5
16
17 frameBuffer.insert (
18 "G", // name // 6
19 Slice (
20 HALF, // type // 7
21 (char*) gPixels, // base // 8
22 sizeof (*gPixels) * 1, // xStride // 9
23 sizeof (*gPixels) * width)); // yStride // 10
24
25 frameBuffer.insert (
26 "Z", // name // 11
27 Slice (
28 FLOAT, // type // 12
29 (char*) zPixels, // base // 13
30 sizeof (*zPixels) * 1, // xStride // 14
31 sizeof (*zPixels) * width)); // yStride // 15
32
33 file.setFrameBuffer (frameBuffer); // 16
34 file.writePixels (height); // 17
35}
On line 8, an OpenEXR header is created, and the header’s display
window and data window are both set to (0, 0) - (width-1,
height-1).
Lines 9 and 10 specify the names and types of the image channels that will be stored in the file.
Constructing an OutputFile object in line 12 opens the file with
the specified name, and stores the header in the file.
Lines 14 through 28 tell the OutputFile object how the pixel data
for the image channels are laid out in memory. After constructing a
FrameBuffer object, a Slice is added for each of the image
file’s channels. A Slice describes the memory layout of one
channel. The constructor for the Slice object takes four
arguments, type, base, xStride, and yStride. type
specifies the pixel data type (HALF, FLOAT, or UINT); the
other three arguments define the memory address of pixel (x,y) as
base + x * xStride + y * yStride.
Note: base is of type char*, and that offsets from
base are not implicitly multiplied by the size of an individual
pixel, as in the RGBA-only interface. xStride and yStride must
explicitly take the size of the pixels into account.
With the values specified in our example, the OpenEXR library computes
the address of the G channel of pixel (x,y) like this:
1(half*)((char*)gPixels + x * sizeof(half) * 1 + y * sizeof(half) * width);
2 // = (half*)((char*)gPixels + x * 2 + y * 2 * width);
The address of the Z channel of pixel (x,y) is
1float* Z =
2(float*)((char*)zPixels + x * sizeof(float) * 1 + y * sizeof(float) * width);
3 // = (float*)((char*)zPixels + x * 4 + y * 4 * width);
The writePixels() call in line 29 copies the image’s pixels from
memory into the file. As in the RGBA-only interface, the argument to
writePixels() specifies how many scan lines are copied into the
file. (See Writing an RGBA Image File.)
If the image file contains a channel for which the FrameBuffer object
has no corresponding Slice, then the pixels for that channel in the
file are filled with zeroes. If the FrameBuffer object contains a
Slice for which the file has no channel, then the Slice is ignored.
Returning from function writeGZ1() destroys the local OutputFile
object and closes the file.
Writing a Cropped Image
Writing a cropped image using the general interface is analogous to
writing a cropped image using the RGBA-only interface, as shown in
Writing a Cropped RGBA Image. In the file’s header the data window
is set explicitly instead of being generated automatically from the
image’s width and height. The number of scan lines that are stored in
the file is equal to the height of the data window, instead of the
height of the entire image. As in Writing a Cropped RGBA Image, the
example code below assumes that the memory buffers for the pixels are
large enough to hold width by height pixels, but only the
region that corresponds to the data window will be stored in the
file. For smaller memory buffers with room only for the pixels in the
data window, the base, xStride and yStride arguments for
the FrameBuffer object’s slices would have to be adjusted
accordingly. (Again, see Writing a Cropped RGBA Image.)
1void
2writeGZ2 (
3 const char fileName[],
4 const half* gPixels,
5 const float* zPixels,
6 int width,
7 int height,
8 const Box2i& dataWindow)
9{
10 Header header (width, height);
11 header.dataWindow () = dataWindow;
12 header.channels ().insert ("G", Channel (HALF));
13 header.channels ().insert ("Z", Channel (FLOAT));
14
15 OutputFile file (fileName, header);
16
17 FrameBuffer frameBuffer;
18
19 frameBuffer.insert (
20 "G", // name
21 Slice (
22 HALF, // type
23 (char*) gPixels, // base
24 sizeof (*gPixels) * 1, // xStride
25 sizeof (*gPixels) * width)); // yStride
26
27 frameBuffer.insert (
28 "Z", // name
29 Slice (
30 FLOAT, // type
31 (char*) zPixels, // base
32 sizeof (*zPixels) * 1, // xStride
33 sizeof (*zPixels) * width)); // yStride
34
35 file.setFrameBuffer (frameBuffer);
36 file.writePixels (dataWindow.max.y - dataWindow.min.y + 1);
37}
Reading an Image File
In this example, we read an OpenEXR image file using the OpenEXR
library’s general interface. We assume that the file contains two
channels, R, and G, of type HALF, and one channel, Z, of type
FLOAT. If one of those channels is not present in the image file,
the corresponding memory buffer for the pixels will be filled with an
appropriate default value.
1void
2readGZ1 (
3 const char fileName[],
4 Array2D<half>& rPixels,
5 Array2D<half>& gPixels,
6 Array2D<float>& zPixels,
7 int& width,
8 int& height)
9{
10 InputFile file (fileName);
11
12 Box2i dw = file.header ().dataWindow ();
13 width = dw.max.x - dw.min.x + 1;
14 height = dw.max.y - dw.min.y + 1;
15
16 rPixels.resizeErase (height, width);
17 gPixels.resizeErase (height, width);
18 zPixels.resizeErase (height, width);
19
20 FrameBuffer frameBuffer;
21
22 frameBuffer.insert ("R", // name
23 Slice (HALF, // type
24 (char *) (&rPixels[0][0] - // base
25 dw.min.x -
26 dw.min.y * width),
27 sizeof (rPixels[0][0]) * 1, // xStride
28 sizeof (rPixels[0][0]) * width, // yStride
29 1, 1, // x/y sampling
30 0.0)); // fillValue
31
32 frameBuffer.insert ("G", // name
33 Slice (HALF, // type
34 (char *) (&gPixels[0][0] - // base
35 dw.min.x -
36 dw.min.y * width),
37 sizeof (gPixels[0][0]) * 1, // xStride
38 sizeof (gPixels[0][0]) * width, // yStride
39 1, 1, // x/y sampling
40 0.0)); // fillValue
41
42 frameBuffer.insert ("Z", // name
43 Slice (FLOAT, // type
44 (char *) (&zPixels[0][0] - // base
45 dw.min.x -
46 dw.min.y * width),
47 sizeof (zPixels[0][0]) * 1, // xStride
48 sizeof (zPixels[0][0]) * width, // yStride
49 1, 1, // x/y sampling
50 FLT_MAX)); // fillValue
51
52 file.setFrameBuffer (frameBuffer);
53 file.readPixels (dw.min.y, dw.max.y);
54}
First, we open the file with the specified name, by constructing an
InputFile object.
Using the Array2D class template, we allocate memory buffers for
the image’s R, G and Z channels. The buffers are big enough to hold
all pixels in the file’s data window.
Next, we create a FrameBuffer object, which describes our buffers
to the OpenEXR library. For each image channel, we add a slice to the
FrameBuffer.
As usual, the slice’s type, xStride, and yStride describe
the corresponding buffer’s layout. For the R channel, pixel
(dw.min.x, dw.min.y) is at address &rPixels[0][0]. By setting
the type, xStride and yStride of the corresponding
Slice object as shown above, evaluating
base + x * xStride + y * yStride
for pixel (dw.min.x, dw.min.y) produces
(char*)(&rPixels[0][0] - dw.min.x - dw.min.y * width)
 + dw.min.x * sizeof (rPixels[0][0]) * 1
 + dw.min.y * sizeof (rPixels[0][0]) * width
= (char*)&rPixels[0][0]
 - dw.min.x * sizeof (rPixels[0][0])
 - dw.min.y * sizeof (rPixels[0][0]) * width
 + dw.min.x * sizeof (rPixels[0][0])
 + dw.min.y * sizeof (rPixels[0][0]) * width
= &rPixels[0][0] *.*
The address calculations for pixels (dw.min.x+1, dw.min.y) and
(dw.min.x, dw.min.y+1) produce &rPixels[0][0]+1 and
&rPixels[0][0]+width, which is equivalent to &rPixels[0][1]
and &rPixels[1][0].
Each Slice has a fillValue. If the image file does not contain
an image channel for the Slice, then the corresponding memory
buffer will be filled with the fillValue.
The Slice's remaining two parameters, xSampling and
ySampling are used for images where some of the channels are
subsampled, for instance, the RY and BY channels in luminance/chroma
images. (See Luminance/Chroma and Gray-Scale Images.) Unless an
image contains subsampled channels, xSampling and ySampling
should always be set to 1. For details see header files
ImfFrameBuffer.h and ImfChannelList.h.
After describing our memory buffers’ layout, we call readPixels()
to copy the pixel data from the file into the buffers. Just as with
the RGBA-only interface, readPixels() allows random-access to the
scan lines in the file. (See Reading an RGBA Image File in Chunks.)
Interleaving Image Channels in the Frame Buffer
Here is a variation of the previous example. We are reading an image file, but instead of storing each image channel in a separate memory buffer, we interleave the channels in a single buffer. The buffer is an array of structs, which are defined like this:
1struct GZ
2{
3    half g;
4    float z;
5};
The code to read the file is almost the same as before; aside from
reading only two instead of three channels, the only difference is how
base, xStride and yStride for the Slice s in the
FrameBuffer object are computed:
 1void
 2readGZ2 (const char fileName[], Array2D<GZ>& pixels, int& width, int& height)
 3{
 4    InputFile file (fileName);
 5
 6    Box2i dw = file.header ().dataWindow ();
 7    width    = dw.max.x - dw.min.x + 1;
 8    height   = dw.max.y - dw.min.y + 1;
 9
10    int dx = dw.min.x;
11    int dy = dw.min.y;
12
13    pixels.resizeErase (height, width);
14
15    FrameBuffer frameBuffer;
16
17    frameBuffer.insert (
18        "G",
19        Slice (
20            HALF,
21            (char*) &pixels[-dy][-dx].g,
22            sizeof (pixels[0][0]) * 1,
23            sizeof (pixels[0][0]) * width));
24
25    frameBuffer.insert (
26        "Z",
27        Slice (
28            FLOAT,
29            (char*) &pixels[-dy][-dx].z,
30            sizeof (pixels[0][0]) * 1,
31            sizeof (pixels[0][0]) * width));
32
33    file.setFrameBuffer (frameBuffer);
34    file.readPixels (dw.min.y, dw.max.y);
35}
Which Channels are in a File?
In functions readGZ1() and readGZ2(), above, we simply assumed
that the files we were trying to read contained a certain set of
channels. We relied on the OpenEXR library to do “something
reasonable” in case our assumption was not true. Sometimes we want to
know exactly what channels are in an image file before reading any
pixels, so that we can do what we think is appropriate.
The file’s header contains the file’s channel list. Using iterators similar to those in the C++ Standard Template Library, we can iterate over the channels:
1const ChannelList &channels = file.header().channels();
2
3for (ChannelList::ConstIterator i = channels.begin(); i != channels.end(); ++i)
4{
5    const Channel &channel = i.channel();
6    // ...
7}
Channels can also be accessed by name, either with the [] operator, or
with the f indChannel() function:
1// const ChannelList &channels = file.header().channels();
2
3const Channel &channel = channels["G"];
4
5const Channel *channelPtr = channels.findChannel("G");
The difference between the [] operator and findChannel() function is
how errors are handled. If the channel in question is not present,
findChannel() returns 0; the [] operator throws an exception.
Layers
In an image file with many channels it is sometimes useful to group the
channels into layers, that is, into sets of channels that logically
belong together. Grouping channels into layers is done using a naming
convention: channel C in layer L is called L.C.
For example, a computer-generated picture of a 3D scene may contain a separate set of R, G and B channels for the light that originated at each one of the light sources in the scene. Every set of R, G, and B channels is in its own layer. If the layers are called light1, light2, light3, etc., then the full names of the channels in this image are light1.R, light1.G, light1.B, light2.R, light2.G, light2.B, light3.R, and so on.
Layers can be nested; for instance, light1.specular.R refers to the R channel in the specular sub-layer of layer light1.
Channel names that do not contain a ., or that contain a .
only at the beginning or at the end are not considered to be part of
any layer.
Class ChannelList has two member functions that support per-layer
access to channels: layers() returns the names of all layers in a
ChannelList, and channelsInLayer() converts a layer name into
a pair of iterators that allows iterating over the channels in the
corresponding layer.
The following sample code prints the layers in a ChannelList and
the channels in each layer:
 1const ChannelList &channels = file.header().channels(); ;
 2
 3std::set<string> layerNames;
 4
 5channels.layers (layerNames);
 6
 7for (std::set<std::string>::const_iterator i = layerNames.begin(); i != layerNames.end(); ++i)
 8{
 9    cout << "layer " << *i << endl;
10
11    ChannelList::ConstIterator layerBegin, layerEnd;
12    channels.channelsInLayer (*i, layerBegin, layerEnd);
13    for (ChannelList::ConstIterator j = layerBegin; j != layerEnd; ++j)
14    {
15        cout << "tchannel " << j.name() << endl;
16    }
17}
Tiles, Levels and Level Modes
A single tiled OpenEXR file can hold multiple versions of an image,
each with a different resolution. Each version is called a
level. A tiled file’s level mode defines how many levels are
stored in the file. There are three different level modes:
|
The file contains only a single, full-resolution level. A ONE_LEVEL image file is equivalent to a scan line based file; the only difference is that the pixels are accessed by tile instead of by scan line. |
|
The file contains multiple levels. The first level holds the image at
full resolution. Each successive level is half the resolution of the
previous level in x and y direction. The last level contains only a
single pixel. |
|
Like |
In MIPMAP_LEVELS and RIPMAP_LEVELS mode, the size (width or height)
of each level is computed by halving the size of the level with the next
higher resolution. If the size of the higher-resolution level is odd,
then the size of the lower-resolution level must be rounded up or down
in order to avoid arriving at a non-integer width or height. The
rounding direction is determined by the file’s level size rounding
mode.
Within each level, the pixels of the image are stored in a two-dimensional array of tiles. The tiles in an OpenEXR file can be any rectangular shape, but all tiles in a file have the same size. This means that lower-resolution levels contain fewer, rather than smaller, tiles.
An OpenEXR file’s level mode and rounding mode, and the size of the
tiles are stored in an attribute in the file header. The value of this
attribute is a TileDescription object:
 1// Enums defined in ImfTileDescription.h
 2// enum LevelMode
 3// {
 4//     ONE_LEVEL,
 5//     MIPMAP_LEVELS,
 6//     RIPMAP_LEVELS
 7// };
 8
 9// enum LevelRoundingMode
10// {
11//     ROUND_DOWN,
12//     ROUND_UP
13// };
14
15class TileDescription
16{
17  public:
18    unsigned int xSize; // size of a tile in the x dimension
19    unsigned int ySize; // size of a tile in the y dimension
20    LevelMode mode;
21    LevelRoundingMode roundingMode;
22    // ...  (methods omitted)
23};
Using the RGBA-only Interface for Tiled Files
Writing a Tiled RGBA Image File with One Resolution Level
Writing a tiled RGBA image with a single level is easy:
 1void
 2writeTiledRgbaONE1 (
 3    const char  fileName[],
 4    const Rgba* pixels,
 5    int         width,
 6    int         height,
 7    int         tileWidth,
 8    int         tileHeight)
 9{
10    TiledRgbaOutputFile out (
11        fileName,
12        width,
13        height, // image size
14        tileWidth,
15        tileHeight,                        // tile size
16        ONE_LEVEL,                         // level mode
17        ROUND_DOWN,                        // rounding mode
18        WRITE_RGBA);                       // channels in file // 1
19    out.setFrameBuffer (pixels, 1, width); // 2
20    out.writeTiles (0, out.numXTiles () - 1, 0, out.numYTiles () - 1); // 3
21}
Opening the file and defining the pixel data layout in memory are done in almost the same way as for scan line based files:
Construction of the TiledRgbaOutputFile object, on line 7, creates
an OpenEXR header, sets the header’s attributes, opens the file with
the specified name, and stores the header in the file. The header’s
display window and data window are both set to (0, 0) - (width-1,
height-1). The size of each tile in the file will be tileWidth
by tileHeight pixels. The channel list contains four channels, R,
G, B, and A, of type HALF.
Line 13 specifies how the pixel data are laid out in memory. The
arithmetic involved in calculating the memory address of a specific
pixel is the same as for the scan line based interface. (See Writing
an RGBA Image File). We assume that the pixels pointer points to
an array of width*height pixels, which contains the entire image.
Line 14 copies the pixels into the file. The TiledRgbaOutputFile‘s writeTiles() method takes four arguments, dxMin, dyMin,
dxMax and dyMax; writeTiles() writes all tiles that have
tile coordinates (dx,dy), where dxMin ≤ dx ≤ dxMax and
dyMin ≤ dy ≤ dyMax. The numXTiles() method returns the
number of tiles in the x direction, and similarly, the numYTiles()
method returns the number of tiles in the y direction. Thus,
out.writeTiles (0, out.numXTiles () - 1, 0, out.numYTiles () - 1); // 3
writes the entire image.
This simple method works well when enough memory is available to allocate a frame buffer for the entire image. When allocating a frame buffer for the whole image is not desirable, for example because the image is very large, a smaller frame buffer can be used. Even a frame buffer that can hold only a single tile is sufficient, as demonstrated in the following example:
 1void
 2writeTiledRgbaONE2 (
 3    const char fileName[], int width, int height, int tileWidth, int tileHeight)
 4{
 5    TiledRgbaOutputFile out (
 6        fileName,
 7        width,
 8        height, // image size
 9        tileWidth,
10        tileHeight,  // tile size
11        ONE_LEVEL,   // level mode
12        ROUND_DOWN,  // rounding mode
13        WRITE_RGBA); // channels in file // 1
14
15    Array2D<Rgba> pixels (tileHeight, tileWidth); // 2
16
17    for (int tileY = 0; tileY < out.numYTiles (); ++tileY) // 3
18    {
19        for (int tileX = 0; tileX < out.numXTiles (); ++tileX) // 4
20        {
21            Box2i range = out.dataWindowForTile (tileX, tileY); // 5
22
23            generatePixels (pixels, width, height, range); // 6
24
25            out.setFrameBuffer (
26                &pixels[-range.min.y][-range.min.x],
27                1,          // xStride
28                tileWidth); // yStride // 7
29
30            out.writeTile (tileX, tileY); // 8
31        }
32    }
33}
On line 13 we allocate a pixels array with
tileWidtf*tileHeight elements, which is just enough for one
tile. Line 18 computes the data window range for each tile, that is,
the set of pixel coordinates covered by the tile. The
generatePixels() function, on line 20, fills the pixels array
with one tile’s worth of image data. The same pixels array is
reused for all tiles. We must call setFrameBuffer(), on line 22,
before writing each tile so that the pixels in the array are accessed
properly in the writeTile() call on line 26. Again, the address
arithmetic to access the pixels is the same as for scan line based
files. The values for the base, xStride, and yStride
arguments to the setFrameBuffer() call must be chosen so that
evaluating the expression
base + x * xStride + y * yStride
produces the address of the pixel with coordinates (x,y).
Writing a Tiled RGBA Image File with Mipmap Levels
In order to store a multi-resolution image in a file, we can allocate a
frame buffer large enough for the highest-resolution level, (0,0), and
reuse it for all levels:
 1void
 2writeTiledRgbaMIP1 (
 3    const char fileName[], int width, int height, int tileWidth, int tileHeight)
 4{
 5    TiledRgbaOutputFile out (
 6        fileName,
 7        width,
 8        height,
 9        tileWidth,
10        tileHeight,
11        MIPMAP_LEVELS,
12        ROUND_DOWN,
13        WRITE_RGBA); // 1
14
15    Array2D<Rgba> pixels (height, width); // 2
16
17    out.setFrameBuffer (&pixels[0][0], 1, width); // 3
18
19    for (int level = 0; level < out.numLevels (); ++level) // 4
20    {
21        generatePixels (pixels, width, height, level); // 5
22
23        out.writeTiles (
24            0,
25            out.numXTiles (level) - 1, // 6
26            0,
27            out.numYTiles (level) - 1,
28            level);
29    }
30}
The main difference here is the use of MIPMAP_LEVELS on line 6 for
the TiledRgbaOutputFile constructor. This signifies that the file
will contain multiple levels, each level being a factor of 2 smaller
in both dimensions than the previous level. Mipmap images contain
n levels, with level numbers
(0,0), (1,1), … (n-1,n-1),
where
n = floor (log (max (width, height)) / log (2)) + 1
if the level size rounding mode is ROUND_DOWN, or
n = ceil (log (max (width, height)) / log (2)) + 1
if the level size rounding mode is ROUND_UP. Note that even though
level numbers are pairs of integers, (lx,ly), only levels where
lx equals ly are used in MIPMAP_LEVELS files.
Line 13 allocates a pixels array with width by height
pixels, big enough to hold the highest-resolution level.
In order to store all tiles in the file, we must loop over all levels
in the image (line 17). numLevels() returns the number of levels,
n, in our mipmapped image. Since the tile sizes remain the same in
all levels, the number of tiles in both dimensions varies between
levels. numXTiles() and numYTiles() take a level number as an
optional argument, and return the number of tiles in the x or y
direction for the corresponding level. Line 19 fills the pixels
array with appropriate data for each level, and line 21 stores the
pixel data in the file.
As with ONE_LEVEL images, we can choose to only allocate a frame
buffer for a single tile and reuse it for all tiles in the image:
 1void
 2writeTiledRgbaMIP2 (
 3    const char fileName[], int width, int height, int tileWidth, int tileHeight)
 4{
 5    TiledRgbaOutputFile out (
 6        fileName,
 7        width,
 8        height,
 9        tileWidth,
10        tileHeight,
11        MIPMAP_LEVELS,
12        ROUND_DOWN,
13        WRITE_RGBA);
14
15    Array2D<Rgba> pixels (tileHeight, tileWidth);
16
17    for (int level = 0; level < out.numLevels (); ++level)
18    {
19        for (int tileY = 0; tileY < out.numYTiles (level); ++tileY)
20        {
21            for (int tileX = 0; tileX < out.numXTiles (level); ++tileX)
22            {
23
24                Box2i range = out.dataWindowForTile (tileX, tileY, level);
25
26                generatePixels (pixels, width, height, range, level);
27
28                out.setFrameBuffer (
29                    &pixels[-range.min.y][-range.min.x],
30                    1,          // xStride
31                    tileWidth); // yStride
32
33                out.writeTile (tileX, tileY, level);
34            }
35        }
36    }
37}
The structure of this code is the same as for writing a ONE_LEVEL
image using a tile-sized frame buffer, but we have to loop over more
tiles. Also, dataWindowForTile() takes an additional level
argument to determine the pixel range for the tile at the specified
level.
Writing a Tiled RGBA Image File with Ripmap Levels
The ripmap level mode allows for storing all combinations of reducing
the resolution of the image by powers of two independently in both
dimensions. Ripmap files contains nx*ny levels, with level
numbers:
(0, 0), (1, 0), … (nx-1, 0), (0, 1), (1, 1), … (nx-1, 1), … (0,ny-1), (1,ny-1), … (nx-1,ny-1)
where
nx = floor (log (width) / log (2)) + 1 ny = floor (log (height) / log (2)) + 1
if the level size rounding mode is ROUND_DOWN, or
nx = ceil (log (width) / log (2)) + 1 ny = ceil (log (height) / log (2)) + 1
if the level size rounding mode is ROUND_UP.
With a frame buffer that is large enough to hold level (0,0), we can
write a ripmap file like this:
 1void
 2writeTiledRgbaRIP1 (
 3    const char fileName[], int width, int height, int tileWidth, int tileHeight)
 4{
 5    TiledRgbaOutputFile out (
 6        fileName,
 7        width,
 8        height,
 9        tileWidth,
10        tileHeight,
11        RIPMAP_LEVELS,
12        ROUND_DOWN,
13        WRITE_RGBA);
14
15    Array2D<Rgba> pixels (height, width);
16
17    out.setFrameBuffer (&pixels[0][0], 1, width);
18
19    for (int yLevel = 0; yLevel < out.numYLevels (); ++yLevel)
20    {
21        for (int xLevel = 0; xLevel < out.numXLevels (); ++xLevel)
22        {
23            generatePixels (pixels, width, height, xLevel, yLevel);
24
25            out.writeTiles (
26                0,
27                out.numXTiles (xLevel) - 1,
28                0,
29                out.numYTiles (yLevel) - 1,
30                xLevel,
31                yLevel);
32        }
33    }
34}
As for ONE_LEVEL and MIPMAP_LEVELS files, the frame buffer
doesn’t have to be large enough to hold a whole level. Any frame
buffer big enough to hold at least a single tile will work.
Reading a Tiled RGBA Image File
Reading a tiled RGBA image file is done similarly to writing one:
 1void
 2readTiledRgba1 (
 3    const char fileName[], Array2D<Rgba>& pixels, int& width, int& height)
 4{
 5    TiledRgbaInputFile in (fileName);
 6
 7    Box2i dw = in.dataWindow ();
 8    width    = dw.max.x - dw.min.x + 1;
 9    height   = dw.max.y - dw.min.y + 1;
10
11    int dx = dw.min.x;
12    int dy = dw.min.y;
13
14    pixels.resizeErase (height, width);
15
16    in.setFrameBuffer (&pixels[-dy][-dx], 1, width);
17    in.readTiles (0, in.numXTiles () - 1, 0, in.numYTiles () - 1);
18}
First we need to create a TiledRgbaInputFile object for the given
file name. We then retrieve information about the data window in order
to create an appropriately sized frame buffer, in this case large
enough to hold the whole image at level (0,0). After we set the
frame buffer, we read the tiles from the file.
This example only reads the highest-resolution level of the image. It can be extended to read all levels, for multi-resolution images, by also iterating over all levels within the image, analogous to the examples in Writing a Tiled RGBA Image File with Mipmap Levels, and Writing a Tiled RGBA Image File with Ripmap Levels.
Using the General Interface for Tiled Files
Writing a Tiled Image File
This example is a variation of the one in Writing an Image File. We
are writing a ONE_LEVEL image file with two channels, G, and Z, of
type HALF, and FLOAT respectively, but here the file is tiled
instead of scan line based:
 1void
 2writeTiled1 (
 3    const char   fileName[],
 4    Array2D<GZ>& pixels,
 5    int          width,
 6    int          height,
 7    int          tileWidth,
 8    int          tileHeight)
 9{
10
11    Header header (width, height);                    // 1
12    header.channels ().insert ("G", Channel (HALF));  // 2
13    header.channels ().insert ("Z", Channel (FLOAT)); // 3
14
15    header.setTileDescription (
16        TileDescription (tileWidth, tileHeight, ONE_LEVEL)); // 4
17
18    TiledOutputFile out (fileName, header); // 5
19
20    FrameBuffer frameBuffer; // 6
21
22    frameBuffer.insert (
23        "G", // name // 7
24        Slice (
25            HALF,                            // type // 8
26            (char*) &pixels[0][0].g,         // base // 9
27            sizeof (pixels[0][0]) * 1,       // xStride // 10
28            sizeof (pixels[0][0]) * width)); // yStride // 11
29
30    frameBuffer.insert (
31        "Z", // name // 12
32        Slice (
33            FLOAT,                           // type // 13
34            (char*) &pixels[0][0].z,         // base // 14
35            sizeof (pixels[0][0]) * 1,       // xStride // 15
36            sizeof (pixels[0][0]) * width)); // yStride // 16
37
38    out.setFrameBuffer (frameBuffer);                                  // 17
39    out.writeTiles (0, out.numXTiles () - 1, 0, out.numYTiles () - 1); // 18
40}
As one would expect, the code here is very similar to the code in
Writing an Image File. The file’s header is created in line 1,
while lines 2 and 3 specify the names and types of the image channels
that will be stored in the file. An important addition is line 4,
where we define the size of the tiles and the level mode. In this
example we use ONE_LEVEL for simplicity. Line 5 opens the file and
writes the header. Lines 6 through 17 tell the TiledOutputFile
object the location and layout of the pixel data for each
channel. Finally, line 18 stores the tiles in the file.
Reading a Tiled Image File
Reading a tiled file with the general interface is virtually identical to reading a scan line based file, as shown in Interleaving Image Channels in the Frame Buffer; only the last three lines are different. Instead of reading all scan lines at once with a single function call, here we must iterate over all tiles we want to read.
 1void
 2readTiled1 (const char fileName[], Array2D<GZ>& pixels, int& width, int& height)
 3{
 4    TiledInputFile in (fileName);
 5
 6    Box2i dw = in.header ().dataWindow ();
 7    width    = dw.max.x - dw.min.x + 1;
 8    height   = dw.max.y - dw.min.y + 1;
 9
10    int dx = dw.min.x;
11    int dy = dw.min.y;
12
13    pixels.resizeErase (height, width);
14
15    FrameBuffer frameBuffer;
16
17    frameBuffer.insert (
18        "G",
19        Slice (
20            HALF,
21            (char*) &pixels[-dy][-dx].g,
22            sizeof (pixels[0][0]) * 1,
23            sizeof (pixels[0][0]) * width));
24
25    frameBuffer.insert (
26        "Z",
27        Slice (
28            FLOAT,
29            (char*) &pixels[-dy][-dx].z,
30            sizeof (pixels[0][0]) * 1,
31            sizeof (pixels[0][0]) * width));
32
33    in.setFrameBuffer (frameBuffer);
34    in.readTiles (0, in.numXTiles () - 1, 0, in.numYTiles () - 1);
35}
In this example we assume that the file we want to read contains two
channels, G and Z, of type HALF and FLOAT respectively. If the
file contains other channels, we ignore them. We only read the
highest-resolution level of the image. If the input file contains more
levels (MIPMAP_LEVELS or MIPMAP_LEVELS), we can access the
extra levels by calling a four-argument version of the readTile()
function:
in.readTile (tileX, tileY, levelX, levelY);
or by calling a six-argument version of readTiles():
in.readTiles (tileXMin, tileXMax, tileYMin, tileYMax, levelX, levelY);
Deep Data Files
Writing a Deep Scan Line File
This example creates an deep scan line file with two channels. It demonstrates how to write a deep scan line file with two channels:
type
FLOAT, is called Z, and is used for storing sample depth, andtype
HALF, is called A and is used for storing sample opacity.
The size of the image is width by height pixels.
 1void
 2writeDeepScanLineFile (
 3    const char       filename[],
 4    Box2i            displayWindow,
 5    Box2i            dataWindow,
 6    Array2D<float*>& dataZ,
 7
 8    Array2D<half*>& dataA,
 9
10    Array2D<unsigned int>& sampleCount)
11
12{
13    int height = dataWindow.max.y - dataWindow.min.y + 1;
14    int width  = dataWindow.max.x - dataWindow.min.x + 1;
15
16    Header header (displayWindow, dataWindow);
17
18    header.channels ().insert ("Z", Channel (FLOAT));
19    header.channels ().insert ("A", Channel (HALF));
20    header.setType (DEEPSCANLINE);
21    header.compression () = ZIPS_COMPRESSION;
22
23    DeepScanLineOutputFile file (filename, header);
24
25    DeepFrameBuffer frameBuffer;
26
27    frameBuffer.insertSampleCountSlice (Slice (
28        UINT,
29        (char*) (&sampleCount[0][0] - dataWindow.min.x - dataWindow.min.y * width),
30        sizeof (unsigned int) * 1, // xS
31
32        sizeof (unsigned int) * width)); // yStride
33
34    frameBuffer.insert (
35        "Z",
36        DeepSlice (
37            FLOAT,
38            (char*) (&dataZ[0][0] - dataWindow.min.x - dataWindow.min.y * width),
39            sizeof (float*) * 1, // xStride for pointer
40
41            sizeof (float*) * width, // yStride for pointer array
42            sizeof (float) * 1));    // stride for Z data sample
43
44    frameBuffer.insert (
45        "A",
46        DeepSlice (
47            HALF,
48            (char*) (&dataA[0][0] - dataWindow.min.x - dataWindow.min.y * width),
49            sizeof (half*) * 1,     // xStride for pointer array
50            sizeof (half*) * width, // yStride for pointer array
51            sizeof (half) * 1));    // stride for A data sample
52
53    file.setFrameBuffer (frameBuffer);
54
55    for (int i = 0; i < height; i++)
56    {
57        for (int j = 0; j < width; j++)
58        {
59            sampleCount[i][j] = getPixelSampleCount (i, j);
60            dataZ[i][j]       = new float[sampleCount[i][j]];
61            dataA[i][j]       = new half[sampleCount[i][j]];
62            // Generate data for dataZ and dataA.
63            getPixelSampleData(i, j, dataZ, dataA);
64        }
65
66        file.writePixels (1);
67    }
68
69    for (int i = 0; i < height; i++)
70    {
71        for (int j = 0; j < width; j++)
72        {
73            delete[] dataZ[i][j];
74            delete[] dataA[i][j];
75        }
76    }
77}
The interface for deep scan line files is similar to scan line
files. We added two new classes to deal with deep data:
DeepFrameBuffer and DeepSlice. DeepFrameBuffer only
accepts DeepSlice as its input, except that it accepts Slice
for sample count slice. The first difference we see from the previous
version is:
header.setType (DEEPSCANLINE);
where we set the type of the header to a predefine string
DEEPSCANLINE, then we insert a sample count slice using
insertSampleCountSlice(). After that, we insert a DeepSlice with
deep z data. Notice that deep slices have three strides, one more than
non-deep slices. The first two strides are used for the pointers in the
array. Because the memory space for Array2D is contiguous, we can get
the strides easily. The third stride is used for pixel samples. Because
the data type is float (and we are not interleaving), the stride should
be sizeof(float). If we name the stride for deep data
samples sampleStride, then the memory address of the i-th sample of
this channel in pixel (x, y) is
base +
   x * xStride +
   y * yStride +
   i * sampleStride
Because we may not know the data until we are going to write it, the deep data file must support postponed initialization, as shown in the example code. Another approach would be to prepare all the data first, and then write it all out at once.
Once the slices have been inserted, we get the sample count for each
pixel, via a user-supplied getPixelSampleCount() function, and
dynamically allocate memory for the Z and A channels. We then write to
file in a line-by-line fashion and finally free the the intermediate
data structures.
Reading a Deep Scan Line File
An example of reading a deep scan line file created by previous code.
 1void
 2readDeepScanLineFile (
 3    const char             filename[],
 4    Box2i&                 displayWindow,
 5    Box2i&                 dataWindow,
 6    Array2D<float*>&       dataZ,
 7    Array2D<half*>&        dataA,
 8    Array2D<unsigned int>& sampleCount)
 9{
10    DeepScanLineInputFile file (filename);
11
12    const Header& header = file.header ();
13    dataWindow           = header.dataWindow ();
14    displayWindow        = header.displayWindow ();
15
16    int width  = dataWindow.max.x - dataWindow.min.x + 1;
17    int height = dataWindow.max.y - dataWindow.min.y + 1;
18
19    sampleCount.resizeErase (height, width);
20
21    dataZ.resizeErase (height, width);
22    dataA.resizeErase (height, width);
23
24    DeepFrameBuffer frameBuffer;
25
26    frameBuffer.insertSampleCountSlice (Slice (
27        UINT,
28        (char*) (&sampleCount[0][0] - dataWindow.min.x - dataWindow.min.y * width),
29        sizeof (unsigned int) * 1,       // xStride
30        sizeof (unsigned int) * width)); // yStride
31
32    frameBuffer.insert (
33        "dataZ",
34        DeepSlice (
35            FLOAT,
36            (char*) (&dataZ[0][0] - dataWindow.min.x - dataWindow.min.y * width),
37
38            sizeof (float*) * 1,     // xStride for pointer array
39            sizeof (float*) * width, // yStride for pointer array
40            sizeof (float) * 1));    // stride for Z data sample
41
42    frameBuffer.insert (
43        "dataA",
44        DeepSlice (
45            HALF,
46            (char*) (&dataA[0][0] - dataWindow.min.x - dataWindow.min.y * width),
47            sizeof (half*) * 1,     // xStride for pointer array
48            sizeof (half*) * width, // yStride for pointer array
49            sizeof (half) * 1));    // stride for O data sample
50
51    file.setFrameBuffer (frameBuffer);
52
53    file.readPixelSampleCounts (dataWindow.min.y, dataWindow.max.y);
54
55    for (int i = 0; i < height; i++)
56    {
57        for (int j = 0; j < width; j++)
58        {
59
60            dataZ[i][j] = new float[sampleCount[i][j]];
61            dataA[i][j] = new half[sampleCount[i][j]];
62        }
63    }
64
65    file.readPixels (dataWindow.min.y, dataWindow.max.y);
66
67    for (int i = 0; i < height; i++)
68    {
69        for (int j = 0; j < width; j++)
70        {
71            delete[] dataZ[i][j];
72            delete[] dataA[i][j];
73        }
74    }
75}
The interface for deep scan line files is similar to scan line files. The main the difference is we use the sample count slice and deep data slices. To do this, we added a new method to read the sample count table from the file:
file.readPixelSampleCounts (dataWindow.min.y, dataWindow.max.y);
This method reads all pixel sample counts in the range
[dataWindow.min.y, dataWindow.max.y], and stores the data to sample
count slice in framebuffer.
ReadPixels() supports for postponed memory allocation.
Writing a Deep Tiled File
This example creates an deep tiled file with two channels. It demonstrates how to write a deep tiled file with two channels:
Z, of typeFLOAT, and is used for storing sample depth, andA, typeHALF, and is used for storing sample opacity.
The size of the image is width by height pixels.
 1void
 2writeDeepTiledFile (
 3    const char filename[],
 4    Box2i      displayWindow,
 5    Box2i      dataWindow,
 6    int        tileSizeX,
 7    int        tileSizeY)
 8{
 9    int height = dataWindow.max.y - dataWindow.min.y + 1;
10    int width  = dataWindow.max.x - dataWindow.min.x + 1;
11
12    Header header (displayWindow, dataWindow);
13    header.channels ().insert ("Z", Channel (FLOAT));
14    header.channels ().insert ("A", Channel (HALF));
15    header.setType (DEEPTILE);
16    header.compression () = ZIPS_COMPRESSION;
17
18    header.setTileDescription (
19        TileDescription (tileSizeX, tileSizeY, ONE_LEVEL));
20
21    Array2D<float*> dataZ;
22    dataZ.resizeErase (height, width);
23
24    Array2D<half*> dataA;
25    dataA.resizeErase (height, width);
26
27    Array2D<unsigned int> sampleCount;
28    sampleCount.resizeErase (height, width);
29
30    DeepTiledOutputFile file (filename, header);
31
32    DeepFrameBuffer frameBuffer;
33
34    frameBuffer.insertSampleCountSlice (Slice (
35        UINT,
36        (char*) (&sampleCount[0][0] - dataWindow.min.x - dataWindow.min.y * width),
37        sizeof (unsigned int) * 1,       // xStride
38        sizeof (unsigned int) * width)); // yStride
39
40    frameBuffer.insert (
41        "Z",
42        DeepSlice (
43            FLOAT,
44            (char*) (&dataZ[0][0] - dataWindow.min.x - dataWindow.min.y * width),
45            sizeof (float*) * 1,     // xStride for pointer array
46            sizeof (float*) * width, // yStride for pointer array
47            sizeof (float) * 1));    // stride for samples
48
49    frameBuffer.insert (
50        "A",
51        DeepSlice (
52            HALF,
53            (char*) (&dataA[0][0] - dataWindow.min.x - dataWindow.min.y * width),
54            sizeof (half*) * 1,     // xStride for pointer array
55            sizeof (half*) * width, // yStride for pointer array
56            sizeof (half) * 1));    // stride for samples
57
58    file.setFrameBuffer (frameBuffer);
59
60    for (int j = 0; j < file.numYTiles (0); j++)
61    {
62        for (int i = 0; i < file.numXTiles (0); i++)
63        {
64            // Generate data for sampleCount, dataZ and dataA.
65            getSampleDataForTile (i, j, tileSizeX, tileSizeY, sampleCount, dataZ, dataA);
66            file.writeTile (i, j, 0);
67        }
68    }
69
70    for (int i = 0; i < height; i++)
71    {
72        for (int j = 0; j < width; j++)
73        {
74            delete[] dataZ[i][j];
75            delete[] dataA[i][j];
76        }
77    }
78}
Here, getSampleCountForTile is a user-supplied function that sets
each item in sampleCount array to the correct sampleCount for
each pixel in the tile, and getSampleDataForTile is a
user-supplied function that set the pointers in dataZ and
dataA arrays to point to the correct data
The interface for deep tiled files is similar to tiled files. The differences are:
we set the type of the header to
DEEPTILEwe use
insertSampleCountSlice()to set sample count slice, andwe use
DeepSliceinstead ofSliceto provide three strides needed by the library.
Also, we support postponed initialization.
Reading a Deep Tiled File
An example of reading a deep tiled file created by code explained in the Writing a Deep Tiled File section.
 1void
 2readDeepTiledFile (
 3    const char             filename[],
 4    Box2i&                 displayWindow,
 5    Box2i&                 dataWindow,
 6    Array2D<float*>&       dataZ,
 7    Array2D<half*>&        dataA,
 8    Array2D<unsigned int>& sampleCount)
 9{
10    DeepTiledInputFile file (filename);
11
12    int width  = dataWindow.max.x - dataWindow.min.x + 1;
13    int height = dataWindow.max.y - dataWindow.min.y + 1;
14
15    sampleCount.resizeErase (height, width);
16    dataZ.resizeErase (height, width);
17    dataA.resizeErase (height, width);
18
19    DeepFrameBuffer frameBuffer;
20
21    frameBuffer.insertSampleCountSlice (Slice (
22        UINT,
23        (char*) (&sampleCount[0][0] - dataWindow.min.x - dataWindow.min.y * width),
24        sizeof (unsigned int) * 1,       // xStride
25        sizeof (unsigned int) * width)); // yStride
26
27    frameBuffer.insert (
28        "Z",
29        DeepSlice (
30            FLOAT,
31            (char*) (&dataZ[0][0] - dataWindow.min.x - dataWindow.min.y * width),
32            sizeof (float*) * 1,     // xStride for pointer array
33            sizeof (float*) * width, // yStride for pointer array
34            sizeof (float) * 1));    // stride for samples
35
36    frameBuffer.insert (
37        "A",
38        DeepSlice (
39            HALF,
40            (char*) (&dataA[0][0] - dataWindow.min.x - dataWindow.min.y * width),
41            sizeof (half*) * 1,     // xStride for pointer array
42            sizeof (half*) * width, // yStride for pointer array
43            sizeof (half) * 1));    // stride for samples
44
45    file.setFrameBuffer (frameBuffer);
46
47    int numXTiles = file.numXTiles (0);
48    int numYTiles = file.numYTiles (0);
49
50    file.readPixelSampleCounts (0, numXTiles - 1, 0, numYTiles - 1);
51
52    for (int i = 0; i < height; i++)
53    {
54        for (int j = 0; j < width; j++)
55        {
56            dataZ[i][j] = new float[sampleCount[i][j]];
57            dataA[i][j] = new half[sampleCount[i][j]];
58        }
59    }
60
61    file.readTiles (0, numXTiles - 1, 0, numYTiles - 1);
62
63    // (after read data is processed, data must be freed:)
64
65    for (int i = 0; i < height; i++)
66    {
67        for (int j = 0; j < width; j++)
68        {
69            delete[] dataZ[i][j];
70            delete[] dataA[i][j];
71        }
72    }
73}
This code demonstrates how to read the first level of a deep tiled file created by code explained in the Writing a Deep Tiled File section. The interface for deep tiled files is similar to tiled files. The differences are:
we use
insertSampleCountSlice()to set sample count slicewe use
DeepSliceinstead ofSliceto provide three strides needed by the library, andwe use
readPixelSampleCounts()to read in pixel sample counts into array.
Also we support postponed memory allocation.
In this example, entries in dataZ and dataA have been allocated by the ‘new’ calls must be deleted after use.
Threads
Library Thread-Safety
The OpenEXR library is thread-safe. In a multithreaded application program, multiple threads can concurrently read and write distinct OpenEXR files. In addition, accesses to a single shared file by multiple application threads are automatically serialized. In other words, each thread can independently create, use and destroy its own input and output file objects. Multiple threads can also share a single input or output file. In the latter case the OpenEXR library uses mutual exclusion to ensure that only one thread at a time can access the shared file.
Multithreaded I/O
The OpenEXR library supports multithreaded file input and output where
the library creates its own worker threads that are independent of the
application program’s threads. When an application thread calls
readPixels(), readTiles(), writePixels() or
writeTiles() to read or write multiple scan lines or tiles at
once, the library’s worker threads process the tiles or scanlines in
parallel.
During startup, the application program must enable multithreading by
calling function setGlobalThreadCount(). This tells the OpenEXR
library how many worker threads it should create. (As a special case,
setting the number of worker threads to zero reverts to
single-threaded operation; reading and writing image files happens
entirely in the application thread that calls the OpenEXR library.)
The application program should read or write as many scan lines or
tiles as possible in each call to readPixels(), readTiles(),
writePixels() or writeTiles(). This allows the library to
break up the work into chunks that can be processed in
parallel. Ideally the application reads or writes the entire image
using a single read or write call. If the application reads or writes
the image one scan line or tile at a time, the library reverts to
single-threaded file I/O.
The following function writes an RGBA file using four concurrent worker threads:
1void
2writeRgbaMT (const char fileName[], const Rgba* pixels, int width, int height)
3{
4    setGlobalThreadCount (4);
5
6    RgbaOutputFile file (fileName, width, height, WRITE_RGBA);
7    file.setFrameBuffer (pixels, 1, width);
8    file.writePixels (height);
9}
Except for the call to setGlobalThreadCount(), function writeRgbaMT() is
identical to function writeRgba1() in Writing an RGBA Image File, but on
a computer with multiple processors writeRgbaMT() writes files significantly
faster than writeRgba1().
Multithreaded I/O, Multithreaded Application Program
Function setGlobalThreadCount() creates a global pool of worker
threads inside the OpenEXR library. If an application program has
multiple threads, and those threads read or write several OpenEXR
files at the same time, then the worker threads must be shared among
the application threads. By default each file will attempt to use the
entire worker thread pool for itself. If two files are read or written
simultaneously by two application threads, then it is possible that
all worker threads perform I/O on behalf of one of the files, while
I/O for the other file is stalled.
In order to avoid this situation, the constructors for input and
output file objects take an optional numThreads argument. This
gives the application program more control over how many threads will
be kept busy reading or writing a particular file.
For example, we may have an application program that runs on a four-processor computer. The program has one thread that reads files and another one that writes files. We want to keep all four processors busy, and we want to split the processors evenly between input and output. Before creating the input and output threads, the application instructs the OpenEXR library to create four worker threads:
// main, before application threads are created:

setGlobalThreadCount (4);
In the input and output threads, input and output files are opened
with numThreads set to 2:
// application's input thread

InputFile in (fileName);

// ...
// application's output thread

OutputFile out (fileName, header, 2);

// ...
This ensures that file input and output in the application’s two threads can proceed concurrently, without one thread stalling the other’s I/O.
An alternative approach for thread management of multithreaded
applications is provided for deep scanline input files. Rather than
calling setFrameBuffer(), the host application may call
rawPixelData() to load a chunk of scanlines into a
host-application managed memory store, then pass a DeepFrameBuffer
object and the raw data to readPixelSampleCounts() and
readPixels(). Only the call to rawPixelData blocks; decompressing
the underlying data and copying it to the framebuffer will happen on
the host application’s threads independently. This strategy is
generally ``less efficient`` than reading multiple scanlines at
the same time and allowing OpenEXR’s thread management to decode the
file, but may prove effective when the host application has many
threads available, cannot avoid accessing scanlines in a random order
and wishes to avoid caching an entire uncompressed image. For more
details, refer to the inline comments in ImfDeepScanLineInputFile.h
Low-Level I/O
Custom Low-Level File I/O
In all of the previous file reading and writing examples, we were given a file name, and we relied on the constructors for our input file or output file objects to open the file. In some contexts, for example, in a plugin for an existing application program, we may have to read from or write to a file that has already been opened. The representation of the open file as a C or C++ data type depends on the application program and on the operating system.
At its lowest level, the OpenEXR library performs file I/O via objects
of type IStream and OStream. IStream and OStream are
abstract base classes. The OpenEXR library contains two derived
classes, StdIFStream and StdOFStream, that implement reading
from std::ifstream and writing to std::ofstream objects. An
application program can implement alternative file I/O mechanisms by
deriving its own classes from Istream and Ostream. This way,
OpenEXR images can be stored in arbitrary file-like objects, as long
as it is possible to support read, write, seek and tell operations
with semantics similar to the corresponding std::ifstream and
std::ofstream methods.
For example, assume that we want to read an OpenEXR image from a C
stdio file (of type FILE) that has already been opened. To do
this, we derive a new class, C_IStream, from IStream. The
declaration of class IStream looks like this:
 1class IStream
 2{
 3  public:
 4    virtual ~IStream ();
 5
 6    virtual bool read (char c[], int n) = 0;
 7    virtual uint64_t tellg () = 0;
 8    virtual void seekg (uint64_t pos) = 0;
 9    virtual void clear ();
10    const char * fileName () const;
11    virtual bool isMemoryMapped () const;
12    virtual char * readMemoryMapped (int n);
13
14  protected:
15    IStream (const char fileName[]);
16    private:
17
18    // ...
19};
20
Our derived class needs a public constructor, and it must override four methods:
 1class C_IStream: public IStream
 2{
 3  public:
 4    C_IStream (FILE *file, const char fileName[]):
 5        IStream (fileName), _file (file) {}
 6
 7    virtual bool read (char c[], int n);
 8    virtual uint64_t tellg ();
 9    virtual void seekg (uint64_t pos);
10    virtual void clear ();
11
12  private:
13
14    FILE * _file;
15};
read(c,n) reads n bytes from the file, and stores them in
array c. If reading hits the end of the file before n bytes
have been read, or if an I/O error occurs, read(c,n) throws an
exception. If read(c,n) hits the end of the file after reading
n bytes, it returns false, otherwise it returns true:
 1bool
 2C_IStream::read (char c[], int n)
 3{
 4    if (n != static_cast <int> (fread (c, 1, n, _file)))
 5    {
 6        // fread() failed, but the return value does not distinguish
 7        // between I/O errors and end of file, so we call ferror() to
 8        // determine what happened.
 9
10        if (ferror (_file))
11            throwErrnoExc();
12        else
13            throw InputExc ("Unexpected end of file.");
14    }
15
16    return !feof (_file);
17}
tellg() returns the current reading position, in bytes, from the
beginning of the file. The next read() call will begin reading at
the indicated position:
1uint64_t
2C_IStream::tellg ()
3{
4    return ftell (_file);
5}
seekg(pos) sets the current reading position to pos bytes from
the beginning of the file:
1void
2C_IStream::seekg (uint64_t pos)
3{
4    clearerr (_file);
5    fseek (_file, pos, SEEK_SET);
6}
clear() clears any error flags that may be set on the file after a
read() or seekg() operation has failed:
1void
2C_IStream::clear ()
3{
4    clearerr (_file);
5}
In order to read an RGBA image from an open C stdio file, we first
make a C_IStream object. Then we create an RgbaInputFile,
passing the C_IStream instead of a file name to the
constructor. After that, we read the image as usual (see Reading an
RGBA Image File):
 1void
 2readRgbaFILE (
 3    FILE*          cfile,
 4    const char     fileName[],
 5    Array2D<Rgba>& pixels,
 6    int&           width,
 7    int&           height)
 8{
 9    C_IStream istr (cfile, fileName);
10
11    RgbaInputFile file (istr);
12
13    Box2i dw = file.dataWindow ();
14
15    width  = dw.max.x - dw.min.x + 1;
16    height = dw.max.y - dw.min.y + 1;
17    pixels.resizeErase (height, width);
18
19    file.setFrameBuffer (&pixels[0][0] - dw.min.x - dw.min.y * width, 1, width);
20
21    file.readPixels (dw.min.y, dw.max.y);
22}
Memory-Mapped I/O
When the OpenEXR library reads an image file, pixel data are copied several times on their way from the file to the application’s frame buffer. For compressed files, the time spent copying is usually not significant when compared to how long it takes to uncompress the data. However, when uncompressed image files are being read from a fast file system, it may be advantageous to eliminate one or two copy operations by using memory-mapped I/O.
Memory-mapping establishes a relationship between a file and a
program’s virtual address space, such that from the program’s point of
view the file looks like an array of type char. The contents of
the array match the data in the file. This allows the program to
access the data in the file directly, bypassing any copy operations
associated with reading the file via a C++ std::ifstream or a C
FILE.
Note that the following examples use POSIX memory mapping, not supported on Windows.
Classes derived from IStream can optionally support memory-mapped
input. In order to do this, a derived class must override two virtual
functions, isMemoryMapped() and readMemoryMapped(), in
addition to the functions needed for regular, non-memory-mapped input:
 1class MemoryMappedIStream: public IStream
 2{
 3  public:
 4    MemoryMappedIStream (const char fileName[]);
 5
 6    virtual ~MemoryMappedIStream ();
 7
 8    virtual bool isMemoryMapped () const;
 9    virtual char * readMemoryMapped (int n);
10    virtual bool read (char c[], int n);
11    virtual uint64_t tellg ();
12
13    virtual void seekg (uint64_t pos);
14
15  private:
16
17    char * _buffer;
18    uint64_t _fileLength;
19    uint64_t _readPosition;
20};
The constructor for class MemoryMappedIStream maps the contents of
the input file into the program’s address space. Memory mapping is not
portable across operating systems. The example shown here uses the
POSIX mmap() system call. On Windows files can be memory-mapped by
calling CreateFileMapping() and MapViewOfFile():
 1MemoryMappedIStream::MemoryMappedIStream (const char fileName[])
 2   : IStream (fileName),
 3     _buffer (0),
 4     _fileLength (0),
 5     _readPosition (0)
 6{
 7    int file = open (fileName, O_RDONLY);
 8
 9    if (file < 0)
10        THROW_ERRNO ("Cannot open file \"" << fileName << "\".");
11
12    struct stat stat;
13    fstat (file, &stat);
14
15    _fileLength = stat.st_size;
16
17    _buffer = (char *) mmap (0, _fileLength, PROT_READ, MAP_PRIVATE, file, 0);
18
19    close (file);
20
21    if (_buffer == MAP_FAILED)
22        THROW_ERRNO ("Cannot memory-map file \"" << fileName << "\".");
23}
The destructor frees the address range associated with the file by
un-mapping the file. The POSIX version shown here uses munmap(). A
Windows version would call UnmapViewOfFile() and
CloseHandle():
1bool
2MemoryMappedIStream::isMemoryMapped () const
3{
4    return true;
5}
Function isMemoryMapped() returns true to indicate that
memory-mapped input is supported. This allows the OpenEXR library to
call readMemoryMapped() instead of read():
1MemoryMappedIStream::~MemoryMappedIStream()
2{
3    munmap (_buffer, _fileLength);
4}
readMemoryMapped() is analogous to read(), but instead of
copying data into a buffer supplied by the caller,
readMemoryMapped() returns a pointer into the memory-mapped file,
thus avoiding the copy operation:
 1char *
 2MemoryMappedIStream::readMemoryMapped (int n)
 3{
 4    if (_readPosition >= _fileLength)
 5        throw InputExc ("Unexpected end of file.");
 6
 7    if (_readPosition + n > _fileLength)
 8        throw InputExc ("Reading past end of file.");
 9
10    char *data = _buffer + _readPosition;
11
12    _readPosition += n;
13
14    return data;
15
16}
The MemoryMappedIStream class must also implement the regular read()
function, as well as tellg() and seekg():
 1bool
 2MemoryMappedIStream::read (char c[], int n)
 3{
 4    if (_readPosition >= _fileLength)
 5        throw InputExc ("Unexpected end of file.");
 6
 7    if (_readPosition + n > _fileLength)
 8        throw InputExc ("Reading past end of file.");
 9
10    memcpy (c, _buffer + _readPosition, n);
11
12    _readPosition += n;
13
14    return _readPosition < _fileLength;
15
16}
17
18uint64_t
19MemoryMappedIStream::tellg ()
20{
21    return _readPosition;
22}
23
24void
25MemoryMappedIStream::seekg (uint64_t pos)
26{
27    _readPosition = pos;
28}
Class MemoryMappedIStream does not need a clear()
function. Since the memory-mapped file has no error flags that need to
be cleared, the clear() method provided by class IStream,
which does nothing, can be re-used.
Memory-mapping a file can be faster than reading the file via a C++
std::istream or a C FILE, but the extra speed comes at a
cost. A large memory-mapped file can occupy a significant portion of a
program’s virtual address space. In addition, mapping and un-mapping
many files of varying sizes can severely fragment the address
space. After a while, the program may be unable to map any new files
because there is no contiguous range of free addresses that would be
large enough hold a file, even though the total amount of free space
would be sufficient. An application program that uses memory-mapped
I/O should manage its virtual address space in order to avoid
fragmentation. For example, the program can reserve several address
ranges, each one large enough to hold the largest file that the
program expects to read. The program can then explicitly map each new
file into one of the reserved ranges, keeping track of which ranges
are currently in use.
Miscellaneous
Is this an OpenEXR File?
Sometimes we want to test quickly if a given file is an OpenEXR file.
This can be done by looking at the beginning of the file: The first
four bytes of every OpenEXR file contain the 32-bit integer “magic
number” 20000630 in little-endian byte order. After reading a file’s
first four bytes via any of the operating system’s standard file I/O
mechanisms, we can compare them with the magic number by explicitly
testing if the bytes contain the values 0x76, 0x2f, 0x31,
and 0x01.
Given a file name, the following function returns true if the
corresponding file exists, is readable, and contains an OpenEXR image:
 1bool
 2isThisAnOpenExrFile (const char fileName[])
 3{
 4    std::ifstream f (fileName, std::ios_base::binary);
 5
 6    char b[4];
 7    f.read (b, sizeof (b));
 8
 9    return !!f && b[0] == 0x76 && b[1] == 0x2f && b[2] == 0x31 && b[3] == 0x01;
10}
Using this function does not require linking with the OpenEXR library.
Programs that are linked with the OpenEXR library can determine if a given file is an OpenEXR file by calling one of the following functions, which are part of the library:
 1bool isOpenExrFile (const char fileName[], bool &isTiled);
 2
 3bool isOpenExrFile (const char fileName[]);
 4
 5bool isTiledOpenExrFile (const char fileName[]);
 6
 7bool isOpenExrFile (IStream &is, bool &isTiled);
 8
 9bool isOpenExrFile (IStream &is);
10
11bool isTiledOpenExrFile (IStream &is);
Is this File Complete?
Sometimes we want to test if an OpenEXR file is complete. The file may
be missing pixels, either because writing the file is still in
progress or because writing was aborted before the last scan line or
tile was stored in the file. Of course, we could test if a given file
is complete by attempting to read the entire file, but the input file
classes in the OpenEXR library have an isComplete() method that is
faster and more convenient.
The following function returns true or false, depending on
whether a given OpenEXR file is complete or not:
1bool
2isComplete (const char fileName[])
3{
4    InputFile in (fileName);
5    return in.isComplete();
6}
Preview Images
Graphical user interfaces for selecting image files often represent
files as small preview or thumbnail images. In order to make loading
and displaying the preview images fast, OpenEXR files support storing
preview images in the file headers.
A preview image is an attribute whose value is of type
PreviewImage. A PreviewImage object is an array of pixels of
type PreviewRgba. A pixel has four components, r, g, b
and a, of type unsigned char, where r, g and b are
the pixel’s red, green and blue components, encoded with a gamma of
2.2. a is the pixel’s alpha channel; r, g and b should
be premultiplied by a. On a typical display with 8-bits per
component, the preview image can be shown by simply loading the r,
g and b components into the display’s frame buffer. (No gamma
correction or tone mapping is required.)
The code fragment below shows how to test if an OpenEXR file has a preview image, and how to access a preview image’s pixels:
 1RgbaInputFile file (fileName);
 2
 3if (file.header().hasPreviewImage())
 4{
 5    const PreviewImage &preview = file.header().previewImage();
 6
 7    for (int y = 0; y < preview.height(); ++y)
 8    {
 9        for (int x = 0; x < preview.width(); ++x)
10        {
11
12            const PreviewRgba &pixel = preview.pixel (x, y);
13
14            // ...
15
16        }
17    }
18}
Writing an OpenEXR file with a preview image is shown in the following example. Since the preview image is an attribute in the file’s header, it is entirely separate from the main image. Here the preview image is a smaller version of the main image, but this is not required; in some cases storing an easily recognizable icon may be more appropriate. This example uses the RGBA-only interface to write a scan line based file, but preview images are also supported for files that are written using the general interface, and for tiled files.
 1void
 2writeRgbaWithPreview1 (
 3    const char fileName[], const Array2D<Rgba>& pixels, int width, int height)
 4{
 5    Array2D<PreviewRgba> previewPixels; // 1
 6
 7    int previewWidth;  // 2
 8    int previewHeight; // 3
 9
10    makePreviewImage (
11        pixels,
12        width,
13        height, // 4
14        previewPixels,
15        previewWidth,
16        previewHeight);
17
18    Header header (width, height); // 5
19    header.setPreviewImage (
20        PreviewImage (previewWidth, previewHeight, &previewPixels[0][0]));
21
22    RgbaOutputFile file (fileName, header, WRITE_RGBA); // 7
23    file.setFrameBuffer (&pixels[0][0], 1, width);      // 8
24    file.writePixels (height);                          // 9
25}
Lines 7 through 12 generate the preview image. Line 5 creates a header
for the image file. Line 16 converts the preview image into a
PreviewImage attribute, and adds the attribute to the
header. Lines 18 through 20 store the header (with the preview image)
and the main image in a file.
Function makePreviewImage(), called on line 12, generates the
preview image by scaling the main image down to one eighth of its
original width and height:
 1void
 2makePreviewImage (
 3    const Array2D<Rgba>&  pixels,
 4    int                   width,
 5    int                   height,
 6    Array2D<PreviewRgba>& previewPixels,
 7    int&                  previewWidth,
 8    int&                  previewHeight)
 9{
10    const int N = 8;
11
12    previewWidth  = width / N;
13    previewHeight = height / N;
14
15    previewPixels.resizeErase (previewHeight, previewWidth);
16
17    for (int y = 0; y < previewHeight; ++y)
18    {
19        for (int x = 0; x < previewWidth; ++x)
20        {
21
22            const Rgba&  inPixel  = pixels[y * N][x * N];
23            PreviewRgba& outPixel = previewPixels[y][x];
24
25            outPixel.r = gamma (inPixel.r);
26            outPixel.g = gamma (inPixel.g);
27            outPixel.b = gamma (inPixel.b);
28            outPixel.a = static_cast<int> (Imath::clamp (inPixel.a * 255.f, 0.f, 255.f) + 0.5f);
29        }
30    }
31}
To make this example easier to read, scaling the image is done by just sampling every eighth pixel of every eighth scan line. This can lead to aliasing artifacts in the preview image; for a higher-quality preview image, the main image should be lowpass-filtered before it is subsampled.
Function makePreviewImage() calls gamma() to convert the
floating-point red, green, and blue components of the sampled main
image pixels to unsigned char values. gamma() is a simplified
version of what a program should do on order to show an OpenEXR
image’s floating-point pixels on the screen:
1unsigned char
2gamma (float x)
3{
4    x = pow (5.5555f * max (0.f, x), 0.4545f) * 84.66f;
5    return (unsigned char) Imath::clamp (x, 0.f, 255.f);
6}
makePreviewImage() converts the pixels’ alpha component to
unsigned char by by linearly mapping the range [0.0, 1.0] to
[0,255].
Some programs write image files one scan line or tile at a time, while the image is being generated. Since the image does not yet exist when the file is opened for writing, it is not possible to store a preview image in the file’s header at this time (unless the preview image is an icon that has nothing to do with the main image). However, it is possible to store a blank preview image in the header when the file is opened. The preview image can then be updated as the pixels become available. This is demonstrated in the following example:
 1void
 2writeRgbaWithPreview2 (const char fileName[], int width, int height)
 3{
 4    Array<Rgba> pixels (width);
 5
 6    const int N             = 8;
 7    int       previewWidth  = width / N;
 8    int       previewHeight = height / N;
 9
10    Array2D<PreviewRgba> previewPixels (previewHeight, previewWidth);
11
12    Header header (width, height);
13    header.setPreviewImage (PreviewImage (previewWidth, previewHeight));
14
15    RgbaOutputFile file (fileName, header, WRITE_RGBA);
16    file.setFrameBuffer (pixels, 1, 0);
17
18    for (int y = 0; y < height; ++y)
19    {
20        generatePixels (pixels, width, height, y);
21
22        file.writePixels (1);
23
24        if (y % N == 0)
25        {
26            for (int x = 0; x < width; x += N)
27            {
28                const Rgba&  inPixel  = pixels[x];
29                PreviewRgba& outPixel = previewPixels[y / N][x / N];
30
31                outPixel.r = gamma (inPixel.r);
32                outPixel.g = gamma (inPixel.g);
33                outPixel.b = gamma (inPixel.b);
34                outPixel.a = int (Imath::clamp (inPixel.a * 255.f, 0.f, 255.f) + 0.5f);
35            }
36        }
37    }
38
39    file.updatePreviewImage (&previewPixels[0][0]);
40}
Environment Maps
An environment map is an image that represents an omnidirectional view of a three-dimensional scene as seen from a particular 3D location. Every pixel in the image corresponds to a 3D direction, and the data stored in the pixel represent the amount of light arriving from this direction. In 3D rendering applications, environment maps are often used for image-based lighting techniques that approximate how objects are illuminated by their surroundings. Environment maps with enough dynamic range to represent even the brightest light sources in the environment are sometimes called “light probe images.”
In an OpenEXR file, an environment map is stored as a rectangular
pixel array, just like any other image, but an attribute in the file
header indicates that the image is an environment map. The attribute’s
value, which is of type Envmap, specifies the relation between 2D
pixel locations and 3D directions. Envmap is an enumeration
type. Two values are possible:
|
Latitude-Longitude Map The environment is projected onto the image using polar coordinates (latitude and longitude). A pixel’s x coordinate corresponds to its longitude, and the y coordinate corresponds to its latitude. The pixel in the upper left corner of the data window has latitude +π/2 and longitude +π; the pixel in the lower right corner has latitude -π/2 and longitude -π. In 3D space, latitudes -π/2 and +π/2 correspond to the negative and positive y direction. Latitude 0, longitude 0 points in the positive z direction; latitude 0, longitude π/2 points in the positive x direction. |
For a latitude-longitude map, the size of the data window should be 2×N by N pixels (width by height), where N can be any integer greater than 0. 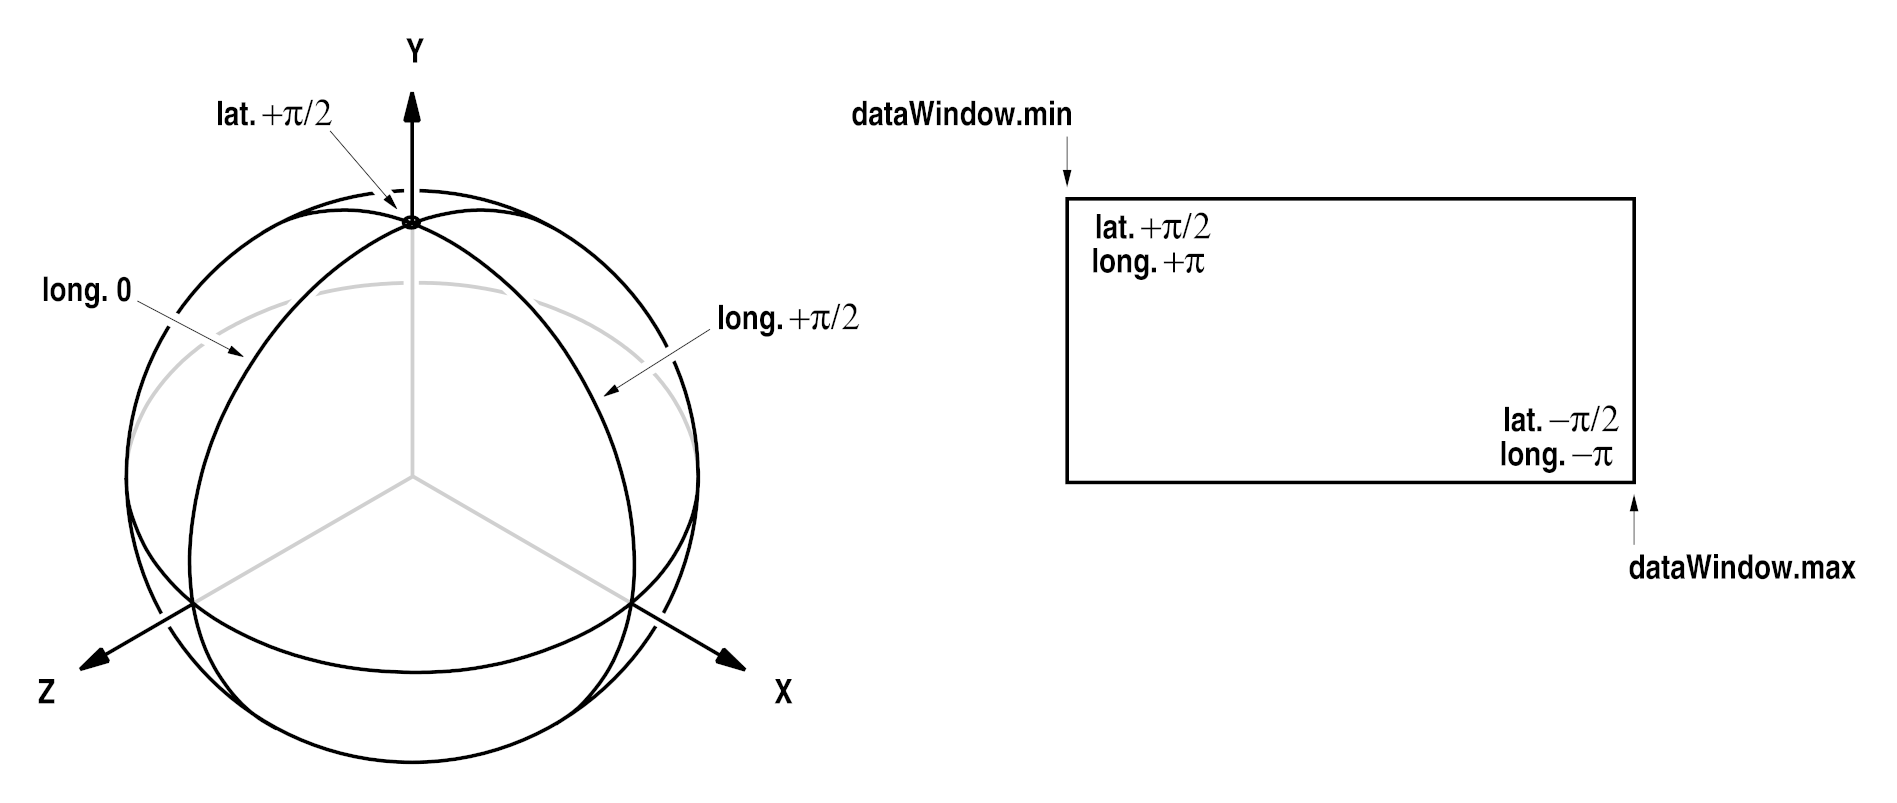
|
|
|
Cube Map The environment is projected onto the six faces of an axis-aligned cube. The cube’s faces are then arranged in a 2D image as shown below. |
For a cube map, the size of the data window should be N by 6×N pixels (width by height), where N can be any integer greater than 0. 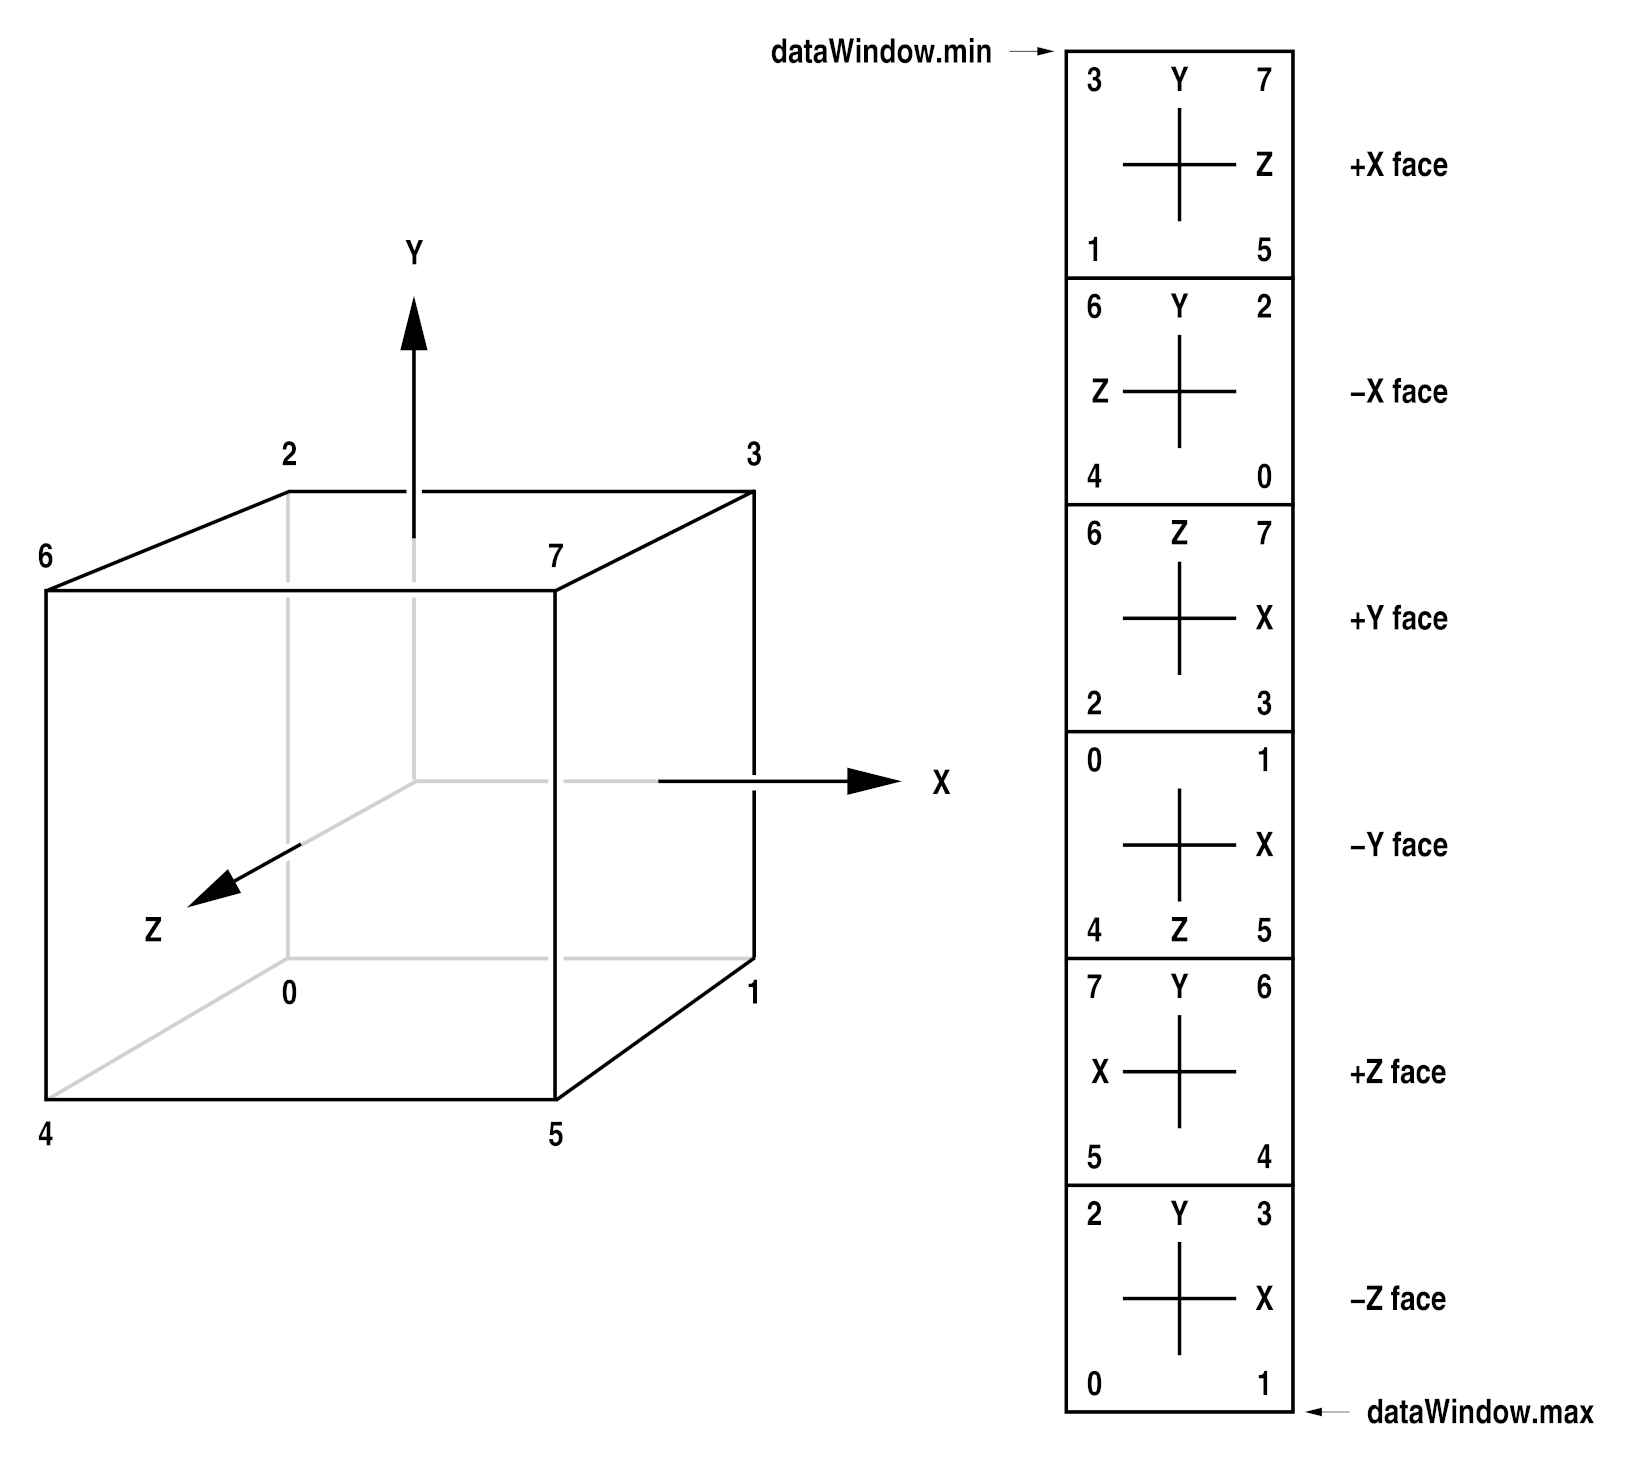
|
Note: Both kinds of environment maps contain redundant pixels: In a latitude-longitude map, the top row and the bottom row of pixels correspond to the map’s north pole and south pole (latitudes +π/2 and -π/2). In each of those two rows all pixels are the same. The leftmost column and the rightmost column of pixels both correspond to the meridian with longitude +π (or, equivalently, -π). The pixels in the leftmost column are repeated in the rightmost column. In a cube-face map, the pixels along each edge of a face are repeated along the corresponding edge of the adjacent face. The pixel in each corner of a face is repeated in the corresponding corners of the two adjacent faces.
The following code fragment tests if an OpenEXR file contains an environment map, and if it does, which kind:
1RgbaInputFile file (fileName);
2
3if (hasEnvmap (file.header()))
4{
5    Envmap type = envmap (file.header());
6    // ...
7}
For each kind of environment map, the OpenEXR library provides a set
of routines that convert from 3D directions to 2D floating-point pixel
locations and back. Those routines are useful in application programs
that create environment maps and in programs that perform map lookups.
For details, see the header file ImfEnvmap.h.
Compression
Data written to OpenEXR files can be compressed using one of several compression algorithms.
To specify the compression algorithm, set the compression() value
on the Header object:
Header header (width, height);
header.channels().insert ("G", Channel (HALF));
header.channels().insert ("Z", Channel (FLOAT));
header.compression() = ZIP_COMPRESSION;
Supported compression types are:
RLE_COMPRESSION |
run length encoding |
ZIPS_COMPRESSION |
zlib compression, one scan line at a time |
ZIP_COMPRESSION |
zlib compression, in blocks of 16 scan lines |
PIZ_COMPRESSION |
piz-based wavelet compression |
PXR24_COMPRESSION |
lossy 24-bit float compression |
B44_COMPRESSION |
lossy 4-by-4 pixel block compression, fixed compression rate |
B44A_COMPRESSION |
lossy 4-by-4 pixel block compression, flat fields are compressed more |
DWAA_COMPRESSION |
lossy DCT based compression, in blocks of 32 scanlines. More efficient for partial buffer access. |
DWAB_COMPRESSION |
lossy DCT based compression, in blocks of 256
scanlines. More efficient space-wise and
faster to decode full frames than
|
ZIP_COMPRESSION and DWA compression compress to a
user-controllable compression level, which determines the space/time
tradeoff. You can control these levels either by setting a global
default or by setting the level directly on the Header object.
setDefaultZipCompressionLevel (6);
setDefaultDwaCompressionLevel (45.0f);
The default zip compression level is 4 for OpenEXR v3.1.3+ and 6 for previous versions. The default DWA compression level is 45.0f.
Alternatively, set the compression level on the Header object:
Header header (width, height);
header.channels().insert ("G", Channel (HALF));
header.channels().insert ("Z", Channel (FLOAT));
header.compression() = ZIP_COMPRESSION;
header.zipCompressionLevel() = 6;